

Bridging assets between chains has become a fundamental part of navigating the rapidly evolving world of decentralized finance. For users who want to move tokens like ETH, USDC, or BNB from networks such as Arbitrum, PulseChain, or BNB Chain to the Base chain, clarity and security are paramount. Yet, with the proliferation of bridges and the constant flux of transaction fees and speeds, knowing the most reliable steps can make all the difference between a seamless transfer and a costly mishap.

Why Bridge to Base?
The Base chain, built on Ethereum’s OP Stack and backed by Coinbase, is quickly becoming a hub for innovative dApps and low-cost transactions. Whether you’re looking to participate in new DeFi protocols, explore Base-native memecoins, or simply take advantage of faster settlement times, moving assets from Arbitrum, PulseChain, or BNB Chain is often the first step.
Yet each source chain presents its own quirks—Arbitrum focuses on scaling Ethereum with optimistic rollups; PulseChain offers high throughput and unique tokenomics; BNB Chain boasts vast liquidity but different technical standards. The good news? Modern cross-chain bridges have simplified much of this complexity.
Step 1: Connect Your Wallet to a Trusted Bridge
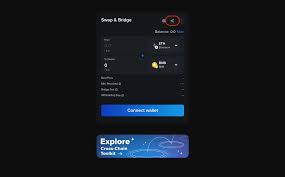
The journey begins by selecting a reputable cross-chain bridge—security here cannot be overstated. Leading options like Synapse, Orbiter, or Symbiosis have earned community trust for their robust smart contracts and transparent operations. Once you access your chosen bridge’s platform:
- Connect your crypto wallet (MetaMask is widely supported) directly on the bridge interface.
- Select your source chain: Arbitrum, PulseChain, or BNB Chain.
- Select your destination chain: Base.
This foundational step ensures that your assets are routed correctly from their origin to their intended destination on Base. Pay attention to any prompts about network switching in your wallet—the bridge will often request this automatically for you.
Step 2: Select Your Token & Compare Routes
The next decision is crucial: which token will you bridge? Most platforms support major assets like ETH, USDC, and BNB. Once selected:
- Enter the amount you want to transfer.
- Review estimated fees: Cross-chain transfers can vary widely in cost depending on network congestion and liquidity pools. Bridges like Symbiosis will show real-time fee estimates before you commit.
- Compare bridge times: Some routes are near-instant; others might require several minutes (or longer during peak periods). Always weigh speed against cost—sometimes waiting an extra minute can save significantly on fees.
This step empowers users to optimize for both speed and economy—a vital consideration as bridging costs can eat into smaller transfers disproportionately. For example, bridging ETH from BNB Chain may differ in cost compared to Arbitrum due to underlying network gas prices.
3 Essential Steps to Bridge Tokens to Base
-
Connect your wallet to a reputable cross-chain bridge (e.g., Synapse, Orbiter, or Symbiosis) and select your source chain (Arbitrum, PulseChain, or BNB) and destination chain (Base). This ensures you are using secure and efficient infrastructure for your transfer.
-

Choose the token you wish to bridge (such as ETH, USDC, or BNB), enter the desired amount, and review estimated fees and bridge time for each route. This step helps you select the fastest and most cost-effective transfer option.
-
Confirm the transaction in your wallet, wait for the bridging process to complete, and verify receipt of your tokens on the Base chain before interacting with dApps or trading. This final check ensures your assets are safely transferred and ready for use.
A Community Perspective on Bridging Choices
If there’s one lesson I’ve learned watching cross-chain activity over the past year—it’s that users are increasingly savvy about comparing routes before hitting “confirm.” Social media is full of real-time fee comparisons and warnings about slow bridges during high-traffic periods. Staying informed pays off.
The right combination of token choice, route selection, and timing can make or break your experience when using any bridge to Base. In the next section we’ll break down final confirmation steps—and highlight what you must check before interacting with any dApp after bridging completes.
Once you’ve carefully selected your token and reviewed the available bridging routes, you’re ready for the critical final phase: transaction confirmation and post-bridge verification. This stage is where attention to detail truly matters. Even with user-friendly interfaces, it’s essential to double-check every detail before proceeding, as errors can result in lost funds or frustrating delays.
Step 3: Confirm the Transaction and Verify Receipt on Base
With your wallet connected and token/route chosen, initiate the transfer by clicking the bridge’s confirmation button. Your wallet (such as MetaMask) will prompt you to review and approve the transaction details—pay close attention here:
- Check the source and destination chains once more—mistakes at this step are rare but can be costly.
- Review gas fees for both the originating chain (e.g., Arbitrum, PulseChain, or BNB) and any additional service fees charged by the bridge.
- Approve the transaction in your wallet interface. Some bridges may require two approvals: one for token spending, another for initiating the bridge.
After approval, your transfer will be processed by the bridge protocol. The time to completion can range from under a minute to several minutes depending on network congestion. Most reputable bridges like Synapse, Orbiter, and Symbiosis provide a progress bar or status updates so you can monitor your transaction in real time.
Confirming Your Bridge Transaction and Verifying Receipt on Base


Post-Bridge Checklist: Ensuring Success Before You Trade
Never assume that funds have arrived until you’ve verified them yourself. Before interacting with any dApp or trading on Base:
- Open your wallet, switch to the Base network, and confirm that your bridged tokens have arrived.
- If you don’t see your tokens immediately, try adding the token contract address manually—this is common with USDC or BNB bridged from non-Ethereum chains.
- If there’s a delay beyond expected bridge times (often shown during Step 2), consult bridge support channels or check block explorers like BaseScan.
Estimated Fees and Average Bridge Times: Arbitrum, PulseChain, BNB Chain to Base
| Source Chain | Token | Estimated Fee (USD) | Average Bridge Time (minutes) |
|---|---|---|---|
| Arbitrum | ETH | $2 – $5 | 3 – 10 |
| Arbitrum | USDC | $1 – $3 | 3 – 10 |
| PulseChain | ETH | $0.50 – $1.50 | 5 – 15 |
| PulseChain | USDC | $0.50 – $1.50 | 5 – 15 |
| BNB Chain | BNB | $0.20 – $1 | 2 – 8 |
| BNB Chain | USDC | $0.20 – $1 | 2 – 8 |
This diligence ensures that you’re not exposed to risk—such as trying to trade tokens that haven’t actually arrived yet. It also gives peace of mind before engaging with new DeFi protocols on Base.
Frequently Asked Questions About Bridging to Base
Community Insights & Best Practices
The DeFi community is constantly sharing tips about maximizing efficiency when using an Arbitrum to Base bridge, BNB to Base bridge, or moving assets from PulseChain. For example, some users recommend bridging during off-peak hours for lower fees; others highlight specific tokens that consistently have higher liquidity across bridges—making transfers both faster and cheaper.
If you’re ever unsure about a specific route or token compatibility (especially when dealing with newer assets), check recent social media threads or Discord channels for up-to-date user experiences. Collective wisdom often catches problems before they become widespread issues.
How often do you compare bridge fees and times before transferring assets?
When bridging assets from Arbitrum, PulseChain, or BNB to Base, do you usually check and compare the estimated fees and transfer times between different bridges before confirming your transaction?
The landscape of cross-chain bridging is evolving rapidly—and while tools are getting better every month, caution remains essential. By following this three-step process—connecting securely via trusted bridges like Synapse or Orbiter; selecting tokens thoughtfully while comparing routes; confirming transactions carefully; and always verifying receipt—you’ll set yourself up for safe participation in all that Base has to offer.
The promise of seamless interoperability between chains is finally being realized—and with it comes new opportunities on platforms like Base. Armed with these best practices and community-driven insights, you’re well positioned to navigate this new frontier confidently.
Once you’ve carefully selected your token and reviewed the available bridging routes, you’re ready for the critical final phase: transaction confirmation and post-bridge verification. This stage is where attention to detail truly matters. Even with user-friendly interfaces, it’s essential to double-check every detail before proceeding, as errors can result in lost funds or frustrating delays.
Step 3: Confirm the Transaction and Verify Receipt on Base
With your wallet connected and token/route chosen, initiate the transfer by clicking the bridge’s confirmation button. Your wallet (such as MetaMask) will prompt you to review and approve the transaction details—pay close attention here:
- Check the source and destination chains once more—mistakes at this step are rare but can be costly.
- Review gas fees for both the originating chain (e.g., Arbitrum, PulseChain, or BNB) and any additional service fees charged by the bridge.
- Approve the transaction in your wallet interface. Some bridges may require two approvals: one for token spending, another for initiating the bridge.
After approval, your transfer will be processed by the bridge protocol. The time to completion can range from under a minute to several minutes depending on network congestion. Most reputable bridges like Synapse, Orbiter, and Symbiosis provide a progress bar or status updates so you can monitor your transaction in real time.
Confirm and Verify Your Bridge Transaction to Base

Post-Bridge Checklist: Ensuring Success Before You Trade
Never assume that funds have arrived until you’ve verified them yourself. Before interacting with any dApp or trading on Base:
- Open your wallet, switch to the Base network, and confirm that your bridged tokens have arrived.
- If you don’t see your tokens immediately, try adding the token contract address manually—this is common with USDC or BNB bridged from non-Ethereum chains.
- If there’s a delay beyond expected bridge times (often shown during Step 2), consult bridge support channels or check block explorers like BaseScan.
Estimated Fees and Average Bridge Times: Arbitrum, PulseChain, BNB Chain to Base
| Source Chain | Token | Estimated Fee (USD) | Average Bridge Time |
|---|---|---|---|
| Arbitrum | ETH | $2 – $5 | ~3-5 min |
| Arbitrum | USDC | $1 – $3 | ~3-5 min |
| PulseChain | ETH | $0.5 – $1.5 | ~2-4 min |
| PulseChain | USDC | $0.5 – $1.5 | ~2-4 min |
| BNB Chain | BNB | $0.2 – $0.6 | ~2-3 min |
| BNB Chain | USDC | $0.2 – $0.6 | ~2-3 min |
This diligence ensures that you’re not exposed to risk—such as trying to trade tokens that haven’t actually arrived yet. It also gives peace of mind before engaging with new DeFi protocols on Base.
Frequently Asked Questions About Bridging to Base
Community Insights & Best Practices
The DeFi community is constantly sharing tips about maximizing efficiency when using an Arbitrum to Base bridge, BNB to Base bridge, or moving assets from PulseChain. For example, some users recommend bridging during off-peak hours for lower fees; others highlight specific tokens that consistently have higher liquidity across bridges—making transfers both faster and cheaper.
If you’re ever unsure about a specific route or token compatibility (especially when dealing with newer assets), check recent social media threads or Discord channels for up-to-date user experiences. Collective wisdom often catches problems before they become widespread issues.
How often do you compare fees and transfer times before bridging assets?
When following our 3-step guide to bridge from Arbitrum, PulseChain, or BNB to Base, reviewing estimated fees and times can make a big difference. We’re curious about your habits!
The landscape of cross-chain bridging is evolving rapidly—and while tools are getting better every month, caution remains essential. By following this three-step process—connecting securely via trusted bridges like Synapse or Orbiter; selecting tokens thoughtfully while comparing routes; confirming transactions carefully; and always verifying receipt—you’ll set yourself up for safe participation in all that Base has to offer.
The promise of seamless interoperability between chains is finally being realized—and with it comes new opportunities on platforms like Base. Armed with these best practices and community-driven insights, you’re well positioned to navigate this new frontier confidently.


